“
 “You don’t have to be a master crafter to be creative!iStockphoto/Thinkstock
Before mass production, crafting was a way of homemaking for many women. You had to make what you needed in order to live. Later on, in the 1960s and ’70s, crafting came back into the forefront as a way to express individual creativity without having to be a bona-fide artist. Dedicated crafters continued their pursuits, but the movement took a downturn for a while before coming back strong in the early 21st century. Now, handmade crafts are all over the place, with many people turning them into businesses as jewelry makers, potters and seamstresses. If you’re new to crafting or just want to get your creative juices flowing, try out some of these simple ideas to get you going in the right crafty direction.
Contents
- Nature Plaque
- Shiny Acorns
- Fancy Bookmarks
- Trophy Wine Stoppers
- Silverware Cabinet Hardware
- Covered Tins
- Custom Desktop
- Nature-inspired Centerpiece
- Clothespin People
- Doily Drink Umbrellas
10: Nature Plaque
One great idea for a beginner crafter is to create a wall plaque with items found in nature. Start with an authentic wood slice as your plaque, which may be difficult to find in the right dimension in nature, so consider buying one from a craft store or online. Then, go on a little nature hike and gather up some acorns, sticks, miniature pine cones, and anything else you might think looks nice on your woody canvas. Once you have your collection, a hot glue gun does the rest of the work. One suggestion for a motif is to use twigs as flower "stems," with the acorn or mini-pinecone pieces as the "petals." In the end, you just need to let the creative juices flow and do what feels right.
9: Shiny Acorns
 “
“ “Gold works, too, if that’s what works for you!Zoonar/Thinkstock
This craft project is super easy and will look nice on a table for your next Christmas party. All you need for this one is some silver modeling paint, silver glitter and a whole lot of acorns. Make sure you gather full acorns with caps. Once you have a bowl full, paint the acorns with the silver paint, and sprinkle the glitter on while the paint is still wet. When your acorns are painted and glittered, put them in a glass jar or vase or a wooden bowl. The result is a shiny, glittery collection of acorns that make a lovely centerpiece or mantelpiece.
8: Fancy Bookmarks
The beauty of this crafty project is that it’s easy, quick and inexpensive, and you can actually use the final product. Start by buying strips of velvet ribbon in varying widths — choosing whatever colors and patterns you fancy. Cut the ribbon into strips of about 6 to 9 inches. Next, you’re going to need some ribbon clamps, which will allow you to attach trinkets to the ends of the bookmark. You can get them at craft stores for pretty cheap. Attach the clamps on both ends of the ribbon and add assorted trinkets and charms to decorate. You can find your own or purchase them from a craft store, along with the jump rings to attach them. Voila, you just made some fancy bookmarks.
The Ring’s the Thing
A jump ring is a metal ring that’s used in jewelry making to attach chains to pendants.
7: Trophy Wine Stoppers
 “
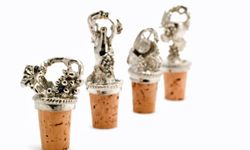
“ “Show off your winnings — in a practical manner.Hemera/Thinkstock
If you like to drink wine and you have an attic full of childhood trophies that have been collecting dust with nostalgic purpose, then this project is for you. All you need for this project are those trophies, a drill, some super glue and some new wine corks. Then, reflect on your days as an amateur bowler or hula hooper while you remove the trophy tops from the base. Drill a hole into the newly purchased wine corks, and then super glue the trophy top into the top of the cork, and you’re all done.
6: Silverware Cabinet Hardware
If you happen to have a thing for vintage flatware, then you’ll love the look of this finished product. Pick your favorite pieces — forks and spoons work best — and turn them into cabinet door pulls for your kitchen cabinets or a large, freestanding cabinet. To start, go over each piece with some light steel wool to make sure all the grime is removed. Next, buy some 1-inch aluminum screw posts, either from a craft store or hardware store. Glue the posts onto the backs of the flatware, one about an inch from the top, the other roughly an inch from the bottom, making sure to attach them to the flattest part of the flatware. Once it fully sets and dries, all you have to do is treat it like standard door pulls and use a screw from the inside of the cabinet door to attach it.
That’s Not Silver
The term tableware is more commonly used these days because people rarely buy forks, spoons and knives made of silver anymore. Silver is expensive and difficult to keep from tarnishing, so most everyday flatware is made from stainless steel.
5: Covered Tins
If you have a nice collection of Christmas cookie tins, you can put them to good use with this simple crafty project. The object is to cover those holiday designs with colorful fabrics or papers, making them useful for every day. When selecting your materials, keep in mind that fabric is a little easier to work with than paper, which tends to be tougher to smooth out when wrapping the tins. Once you have your fabric picked out, the only other thing you’ll need is some Mod Podge (a crafty glue, sealer and finish all wrapped into one product). Follow the simple, brush-on directions on the Mod Podge closely for best results, and make sure to trim any loose bits of paper or fabric on the finished project
4: Custom Desktop
If you need a big work desk or work surface at home but don’t want to spend the money on a nice one, here are some easy instructions for making your own. All you’ll need are two sets of vintage two-drawer file cabinets — look on Craigslist for great deals on used ones — a hollow-core door from a home improvement store, some decorative paper and Mod Podge. The file cabinets serve as your desk base, so place one on each side, the width of the door. Mod Podge the door with the colorful, decorative paper you picked out, making sure to get out any wrinkles or creases. You only need to do one side, but make sure you wrap it around the sides so it’s fully covered. The end result will be a large, inexpensive, one-of-a-kind desk for your home office.
Wrapping a Beetle
The inventor of Mod Podge tested it out by decoupaging bed sheets on a Volkswagon.
3: Nature-inspired Centerpiece
 “
“ “Not only is it elegant, but most of it’s free right in your own backyard.iStockphoto/Thinkstock
This craft project is so simple! All you need is a large, clear vase centerpiece and your imagination. The goal here is to simply put something together that’s pleasing to your eye and the beauty of the project is that nothing is glued or attached so you can try many variations until you get it just right. To start, take a walk in your yard or down the street and keep an eye out for interesting objects. Leaves, acorns, branches and even rocks may have a place in your centerpiece. Birch branches with the bark removed are a good start and can serve as the base of your centerpiece; pine branches with the cones still attached also work nicely. Loose pinecones can fill the bottom of the vase, topped with flower petals if you want to add some color. Get creative and try different combinations of items until you have something that appeals to you.
2: Clothespin People
If you want to get your children involved in some casual crafting, there’s no better place to start than with the classic clothespin people. Anyone who has ever been to summer camp can agree that this project is simple and fun for kids. Any kind of clothespin will work, but the old-style wooden pins without the hinge work best. Gather up some yarn, fabric and googly eyes, along with some glue and your clothespins. The round head of the pin is obviously the head, and the split body of the pin serves as the torso and legs. Use yarn for hair, fabrics as pieces of clothing, and the all-important googly eyes to finish everything off. When you and your kids are finished, attach magnets to the back of each clothespin person so they can live on your refrigerator or you can make them into ornaments for your Christmas tree.
Famous Peepers
Perhaps the most famous instance of googly eyes was the Cookie Monster on "Sesame Street."
1: Doily Drink Umbrellas
If you’re hosting a cocktail party, start with a little crafty fun by making some homemade doily drink umbrellas. For this project, you just need some card stock, small paper doilies, hot glue and wooden skewers. First, hot glue a cut circle of card stock to the center of the doily. Once that dries, make a straight cut from the outside of the doily to the center, through the card stock, and then bend the doily into an umbrellalike cone shape, overlapping and securing with hot glue. Once this dries, simply hot glue a skewer to the center of the underside of the cone, and you have some fun, handmade cocktail umbrellas.
Lots More Information
Related Articles
- Your Ultimate Craft Room Organization Plan
- 10 Easy Crafts for Kids
- Raid the Recycling Bin: 10 Recycled Crafts
Sources
- "Charming Bookmark." Countryliving.com. June 8, 2012. http://www.countryliving.com/crafts/projects/10-practically-free-crafts#slide-1
- "Earthy Wooden Plaque." Bhg.com. June 8, 2012. http://www.bhg.com/crafts/easy/30-minute-projects/quick-nature-crafts/
- "Fork & Spoon Door Pulls." Countryliving.com. Bhg.com. June 8, 2012. http://www.countryliving.com/crafts/projects/10-practically-free-crafts#slide-8
- "Glitzy Acorns." Bhg.com. June 8, 2012. http://www.bhg.com/crafts/easy/30-minute-projects/quick-nature-crafts/#page=2
- "Pinecone Tree Display." Bhg.com. June 8, 2012. http://www.bhg.com/crafts/easy/30-minute-projects/quick-nature-crafts/#page=4
- "Turn paper doilies into drink umbrellas." Countryliving.com. June 8, 2012. http://www.countryliving.com/crafts/projects/summer-crafts#slide-1
- "Vintage Trophy Wine Stoppers." Countryliving.com. June 8, 2012. http://www.countryliving.com/crafts/projects/10-practically-free-crafts#slide-2


