“
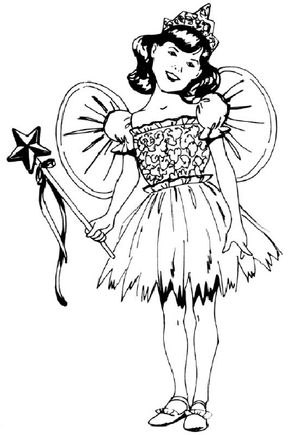 “Draw a little girl in a fairy costume by following our step-by-step directions.Publications International, Ltd.
For Halloween or everyday dress-up fun, nothing beats a fairy costume. Once you learn to draw this little girl in a fairy costume, you can have magical fun in your imagination. Abracadabra!
In this section, we’ll show you how to draw the above little girl in a fairy costume. Either draw the picture freehand while looking at your computer monitor or print out this page to get a closer look at each step.
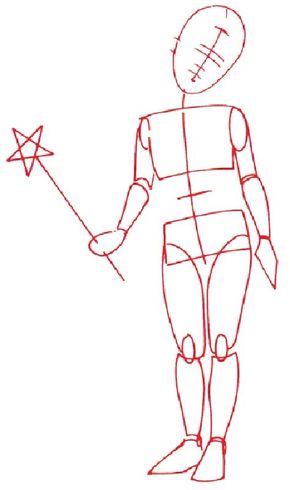
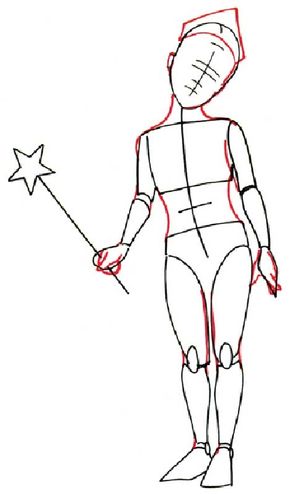
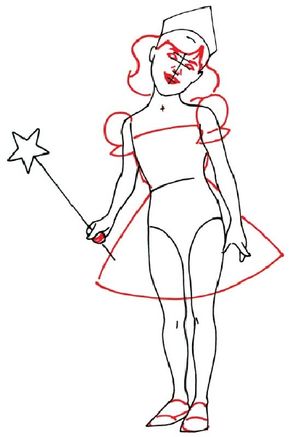
Follow the red lines in each illustration to learn exactly what to draw in that step. The lines drawn in previous steps are shown in black. Here, we’ll show you an illustration of each step and then give you a description of how to draw it.
Contents
- 1: Draw the Body
- 2: Draw the Hat and Shape the Body
- 3: Draw the Hair, Face and Clothing
- 4: Add Details
- 5: Add Shading and Final Touches
1: Draw the Body
 “
“ “
“
Sketch a tipped oval for the head. Divide the oval into uneven left and right halves with a vertical line to determine the center of the face. Separate the oval into upper and lower halves with a horizontal line to show the position of the tops of the eyes.
Sketch a horizontal line for the hairline about one-sixth of the way down from the top of the oval. Divide the area below that into three equal parts. The first line below the hairline is for the eyebrows, and the next line shows the location of the tip of the nose. The ears lie between the eyebrows and the nose.
Divide the area below the nose into three more equal parts. The line below the nose is for the mouth opening, and the next line is for the lower lip.
Draw a straight line under the head to show the shape of the neck and backbone. Use rectangles for the chest and hip areas. Form the arms and legs with curved tube shapes. Add ovals to shape the shoulders and kneecaps.
Draw a short horizontal line between the chest and hip rectangles to mark the waist. Shape the left hand in an oval shape and the right hand in a diamond shape. Use wedge shapes for the feet. Draw in a long straight line for the wand in the left hand and top it with a star.
2: Draw the Hat and Shape the Body
 “
“ “
“
Draw a V-shaped figure over a U-shaped figure. Connect the two shapes with short straight lines to form the hat.
Use small oval shapes to form the ears.
Establish the jawline with a U-shaped figure. Extend curved lines from the jawline down to the shoulders and arms.
Smooth out the legs with slightly curved lines. Shape the hands as shown here.
3: Draw the Hair, Face and Clothing
 “
“ “
“
Shape the hair with long curved lines.
Add the eyes and eyebrows with short curved lines. Use short straight lines for the nose. Form the lips with thick curved lines.
Use odd-shaped ovals and triangles for the sleeves. Draw a straight line across the chest for the neckline. Add two curved lines for the sides and an incomplete triangle for the skirt.
Smooth the fingers and shoes with curved lines.
4: Add Details
 “
“ “
“
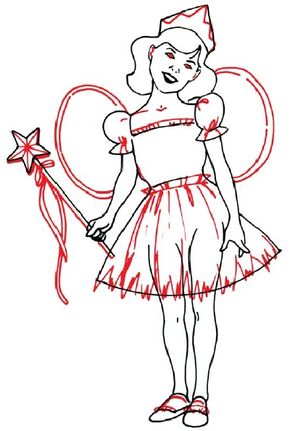
Finish the eyes with ovals. Use zigzag lines to shape the crown.
Form the wings with two oval shapes. Extend them over the shoulders and under the elbows.
Draw horizontal lines at the waist, bodice, and shoes to shape the ruffles. Add many straight lines to the skirt and hem to show the folds and uneven hem. Shape the sleeves with a few scribbles.
Shade the star and draw a ribbon on the wand as shown.
5: Add Shading and Final Touches
 “
“ “
“
Shade the hair with dark curved lines. Add lacy scribbles to the crown and bodice. Draw long straight lines from the sleeves to the outer parts of the wings. Add shading to the wand, shoes, and skirt.
You did it! Now the little girl looks like she’s ready to go to a costume party. But who will she go with? See the next page to draw the perfect complement to the little girl in a fairy costume — a boy in a pirate costume.
In the next section, learn to draw a boy in a pirate costume.
